> ## Documentation Index
> Fetch the complete documentation index at: https://arize-ax.mintlify.site/docs/llms.txt
> Use this file to discover all available pages before exploring further.
# Saved Views (Tracing)
> Save and reuse your Tracing table setup—filters, columns, sort, and time range—per project.
Saved Views let you save and reuse a **Tracing** table setup—filters, visible columns, sort order, and time range—so the team can rely on the same configuration. Saved view definitions are **shared per project**; updating a view changes it for everyone. You can still set a **personal default** so your preferred view loads when you open Tracing.
# Why use saved views?
* **Reuse a full layout** — One selection restores filters, column visibility and order, sort, and time range.
* **Personal default** — Choose which view loads when you open Tracing for a project; other users keep their own defaults.
* **Built-in starting points** — **Arize Default** and **Errors** are always available; fork them with **Save as new view** when you need a custom variant.
* **Fewer repeated steps** — Stop reapplying the same column and sort setup after every session.
# Where to find saved views
On the **Tracing** page for a model:
1. Look at the toolbar above the table.
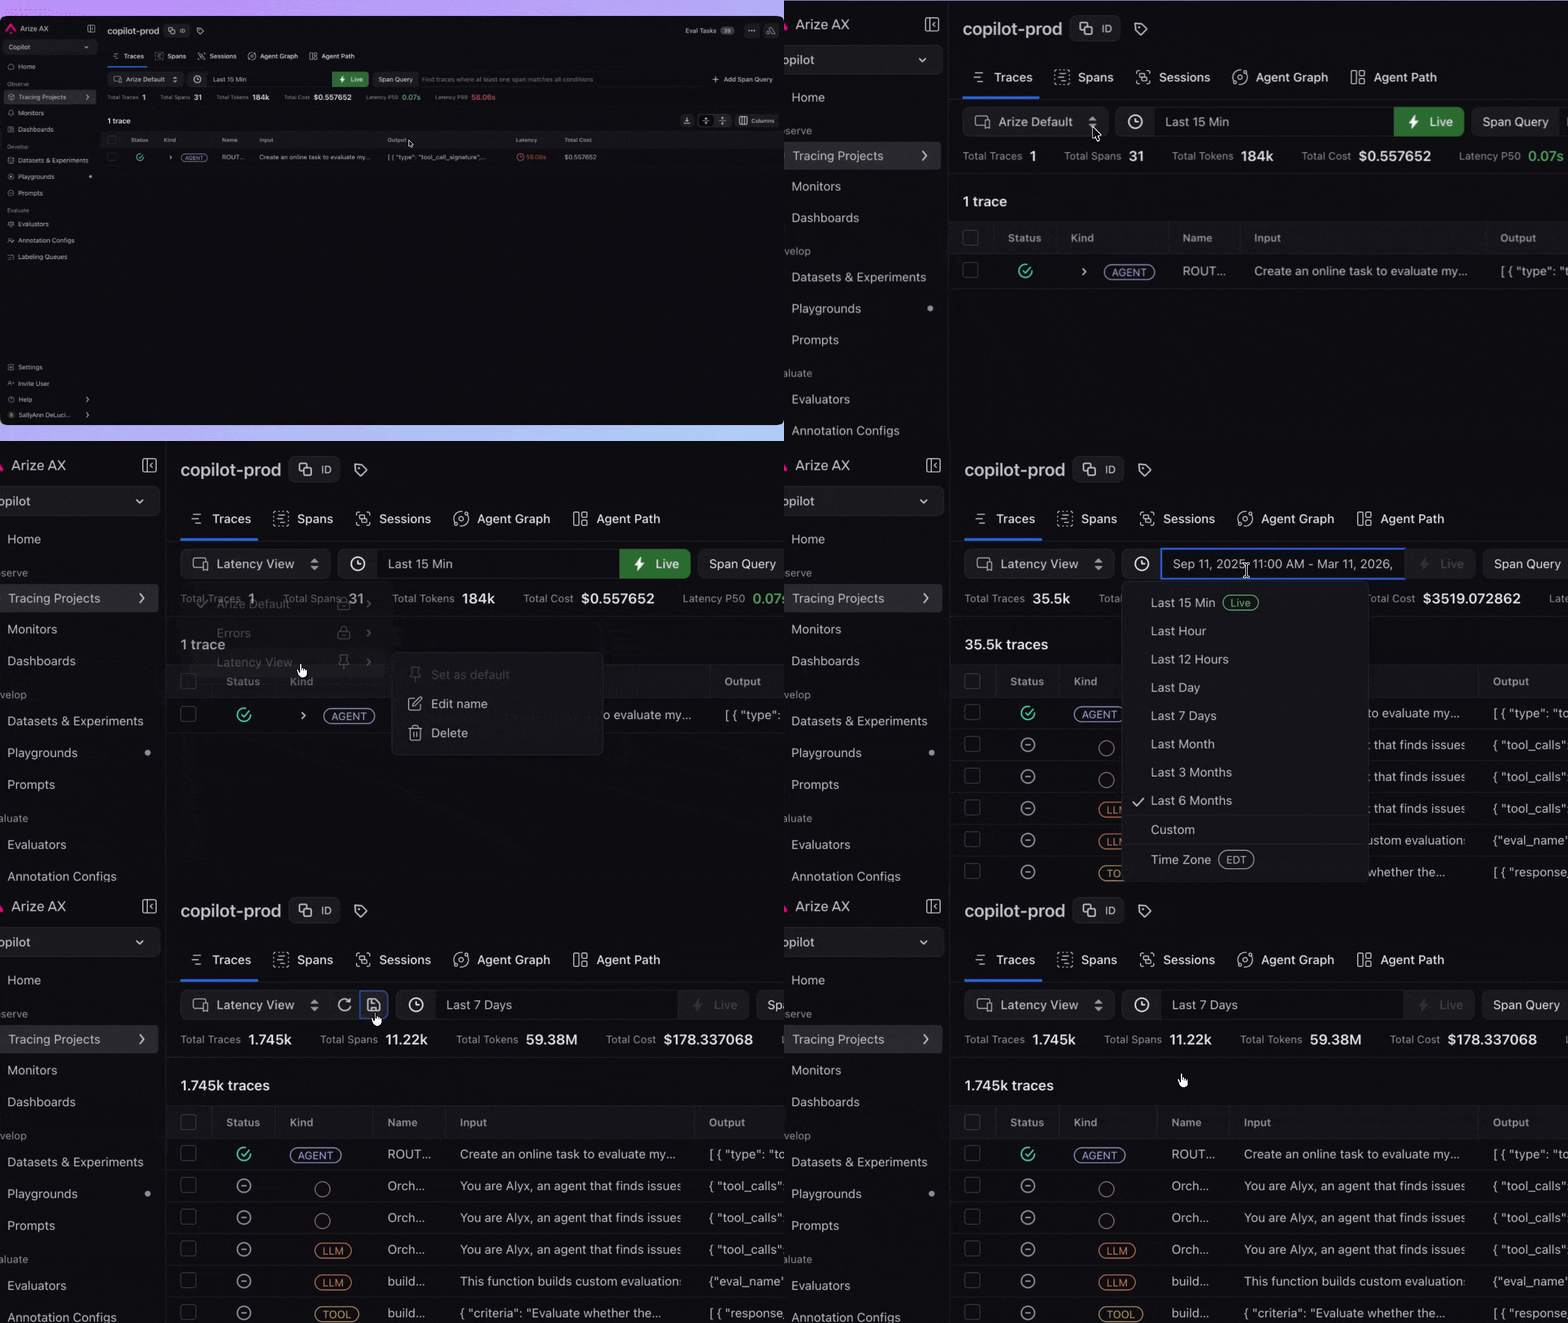
2. Find the **Views** control—it shows the current view name (e.g. **Arize Default** or **Errors**).
3. Click it to open the list of views and manage them.
The control is available in both **Traces** and **Spans** table modes.
 # Built-in views
Arize AX provides two views out of the box. You can use them as-is or as a starting point. **You cannot overwrite them**—any changes must be saved as a new view.
| View | Description |
| ----------------- | ------------------------------------------------------------------------------------------------------------------ |
| **Arize Default** | Standard columns, no filter, default time range (e.g. last 15 minutes). Good for a general-purpose look at traces. |
| **Errors** | Same columns as Arize Default, pre-filtered to spans with `status_code = 'ERROR'`. Use to focus on failures. |
Built-in views show a lock icon in the list. To keep changes you made while on one of them, use **Save as new view**.
# Create, update, and switch views
## Save as new view
1. Set up the table (filters, columns, sort, time range).
2. Open **Views**.
3. Click the **Save** (disk) button.
4. Choose **Save as new view**.
5. Enter a **name** (and optionally a description), then **Save View**.
The new view is added and selected. Click the **>** next to it to **set as default**, **rename**, or **delete** (built-in views only allow **set as default**).
## Update an existing view
When you’re on a **custom** saved view and you change the table (filters, columns, sort, or time range), those changes are **unsaved** until you persist them. You’ll see:
* **Reset** — Discards your changes and restores the table to the last saved state of that view.
* **Save** — Opens options to persist your changes.
**Update existing view** overwrites that view’s stored configuration **for everyone** who uses the project—the view is shared, not personal. Anyone who selects that view later gets the updated filters, columns, sort, and time range.
1. Make your changes.
2. Click **Save** → **Update existing view** only when you intend to change the shared view for all users.
If you want to experiment without affecting others, use **Save as new view** instead and give it a distinct name.
You cannot update **Arize Default** or **Errors**. Use **Save as new view** to branch from them.
## Switch views
1. Open **Views** (the label shows the current view).
2. Click the view you want.
The table updates to that view’s filters, columns, sort, and time range. The active view is indicated in the list (e.g. checkmark).
# Set a default view
Your default is **per project** and **only affects your account**—other users set their own.
1. Open **Views**.
2. Find the view you want.
3. Click the **>** on that view’s row to open the actions submenu.
4. Choose **Set as default**.
A pin icon next to a view indicates it’s your current default. To fall back to **Arize Default** on load, use **>** on **Arize Default** → **Set as default**. If you delete the view that was your default, Tracing falls back to **Arize Default** next time.
# Manage your views
Each view in the list has a **>** on the row. Click it to open the actions submenu:
| Action | Built-in views | Your saved views |
| -------------- | -------------- | ---------------- |
| Set as default | ✓ | ✓ |
| Edit name | ✗ | ✓ |
| Delete | ✗ | ✓ |
* **Edit name** — Updates the label (and optional description); the saved configuration stays the same.
* **Delete** — Removes the view permanently. The table switches to another view (e.g. **Arize Default**). This cannot be undone.
# What gets saved in a view
When you apply a view, all of the following are restored:
| Setting | Stored |
| -------------- | --------------------------------------------------------- |
| **Filter** | Full filter/query (including subqueries and expressions). |
| **Columns** | Visible column IDs and order. |
| **Sort** | Sort column and direction (asc/desc). |
| **Time range** | Preset or custom window and timezone. |
If the project no longer has a column that was saved in the view (e.g. after a schema change), that column is skipped and you may see a notice. The rest of the view still applies.
# Built-in views
Arize AX provides two views out of the box. You can use them as-is or as a starting point. **You cannot overwrite them**—any changes must be saved as a new view.
| View | Description |
| ----------------- | ------------------------------------------------------------------------------------------------------------------ |
| **Arize Default** | Standard columns, no filter, default time range (e.g. last 15 minutes). Good for a general-purpose look at traces. |
| **Errors** | Same columns as Arize Default, pre-filtered to spans with `status_code = 'ERROR'`. Use to focus on failures. |
Built-in views show a lock icon in the list. To keep changes you made while on one of them, use **Save as new view**.
# Create, update, and switch views
## Save as new view
1. Set up the table (filters, columns, sort, time range).
2. Open **Views**.
3. Click the **Save** (disk) button.
4. Choose **Save as new view**.
5. Enter a **name** (and optionally a description), then **Save View**.
The new view is added and selected. Click the **>** next to it to **set as default**, **rename**, or **delete** (built-in views only allow **set as default**).
## Update an existing view
When you’re on a **custom** saved view and you change the table (filters, columns, sort, or time range), those changes are **unsaved** until you persist them. You’ll see:
* **Reset** — Discards your changes and restores the table to the last saved state of that view.
* **Save** — Opens options to persist your changes.
**Update existing view** overwrites that view’s stored configuration **for everyone** who uses the project—the view is shared, not personal. Anyone who selects that view later gets the updated filters, columns, sort, and time range.
1. Make your changes.
2. Click **Save** → **Update existing view** only when you intend to change the shared view for all users.
If you want to experiment without affecting others, use **Save as new view** instead and give it a distinct name.
You cannot update **Arize Default** or **Errors**. Use **Save as new view** to branch from them.
## Switch views
1. Open **Views** (the label shows the current view).
2. Click the view you want.
The table updates to that view’s filters, columns, sort, and time range. The active view is indicated in the list (e.g. checkmark).
# Set a default view
Your default is **per project** and **only affects your account**—other users set their own.
1. Open **Views**.
2. Find the view you want.
3. Click the **>** on that view’s row to open the actions submenu.
4. Choose **Set as default**.
A pin icon next to a view indicates it’s your current default. To fall back to **Arize Default** on load, use **>** on **Arize Default** → **Set as default**. If you delete the view that was your default, Tracing falls back to **Arize Default** next time.
# Manage your views
Each view in the list has a **>** on the row. Click it to open the actions submenu:
| Action | Built-in views | Your saved views |
| -------------- | -------------- | ---------------- |
| Set as default | ✓ | ✓ |
| Edit name | ✗ | ✓ |
| Delete | ✗ | ✓ |
* **Edit name** — Updates the label (and optional description); the saved configuration stays the same.
* **Delete** — Removes the view permanently. The table switches to another view (e.g. **Arize Default**). This cannot be undone.
# What gets saved in a view
When you apply a view, all of the following are restored:
| Setting | Stored |
| -------------- | --------------------------------------------------------- |
| **Filter** | Full filter/query (including subqueries and expressions). |
| **Columns** | Visible column IDs and order. |
| **Sort** | Sort column and direction (asc/desc). |
| **Time range** | Preset or custom window and timezone. |
If the project no longer has a column that was saved in the view (e.g. after a schema change), that column is skipped and you may see a notice. The rest of the view still applies.